Thursday, 25 July 2013

Light & Summery Lemon Cup Cakes!

Been feeling in the baking mood all week seeing as though I'm now a jobless bum again with tonnes of time on my hands..so today was the day!
It's very very warm..kind of sunny today so I thought what better than a lovely fresh lemon cake! Never made them before and I was unsure of whether they would turn out as I sort of just bashed loads of ingredients together and hoped for the best..but all was well and they're prettyyy tasty!


To make them you need:

125g Self raising flour
125g Butter
125g Sugar
3 Eggs
Zest from 1 lemon
Juice from 1/2 lemon

1) Cream together butter & sugar in a bowl until smooth

2) Crack in the eggs & mix until smooth batter

3) Add the lemon zest & juice

4) Fold in the flour

5) Place into cases in & put into a preheated oven at 180 degrees.

For the frosting:

125g Butter
250g Icing sugar
Juice of 1/2 lemon

1) Mix together the butter & icing sugar gradually to make a thick paste

2) Add in the lemon juice and mix again until smooth

3) I usually add a bit of blue food colouring if I want white frosting..makes it look whiter!

4) Spread onto the cooled cakes (or pipe if you can be bothered!)

5) Voila!


P.s.. Please also excuse my dreadful attempt to make my photos look like something out of a baking book.

Wednesday, 3 April 2013

Low Fat Banana & Raspberry Muffins!

Felt in a baking mood today but Mam and me are trying to be on a diet..so looked for some low fat recipes. None of them really took my fancy so I sort of just combined a few together to make my own!
The original idea was banana and blueberry but for some reason Morrisons had no blueberries?! So raspberry it was instead.


To make them you will need:

300g self raising flour
100g brown sugar
50g porridge oats
1tsp bicarbonate of soda
4 egg whites
2 bananas
200g raspberries

1) Mix together the dry ingredients in a bowl
2) Mash the bananas to a smooth paste in a bowl and then add in the egg whites
3) Make a well in the dry mixture and pour in the egg and banana mix
4) Stir until mixed together..the mixture is very sticky and thick and looks a bit odd but don't worry!
5) Stir in the raspberries very carefully!
6) Spoon mixture into muffin cases, fill them quite full!
7) Put into an oven pre-heated to 180 degrees for 18-20 mins!

They are absolutely delish! What I did notice though is that they stick to the cases quite a lot..might try greasing the cases with oil in future!!

Wednesday, 19 December 2012

Christmas Tree Cup Cakes!


I made these for my Mam to take to her Christmas party at work but I'm also making some for the family on Christmas day..so this was a good practice for then!

They actually turned out better than I imagined for my first try and I am super pleased with them..the Christmas spiced sponge is do die for as well!! I think next time I will make the trees higher!

To make these you will need:


225g (8oz) butter
225g (8oz) caster sugar
225g (8oz) self-raising flour
4 medium eggs
1 tsp ground cinnamon
1 tsp ground nutmeg
1 tsp ground ginger
1 tsp vanilla extract

1) Preheat oven to 180 degrees / Gas mark 4
2) Cream together butter & sugar
3) Beat in the eggs
4) Fold in the flour gradually
5) Add the spices and the vanilla extract
6) Spoon into cake cases & bake for 15-20 mins

For the icing:

125g (4oz) icing sugar
100g (3oz) butter
1 tsp vanilla extract
1 tbsp green food dye

1) Cream together butter & icing sugar
2) Add the vanilla extract and the food dye. You might need to add more dye than this depending on how green you want it!
3) Spoon into a piping bag with a large star end nozzle.
4) Start from the middle and work your way upwards in a spiral to make a Christmas tree shape.
5) Decorate with silver balls for a bauble effect!

Wednesday, 12 December 2012

Christmas Tree Shortbread Biscuits!


I found some Christmas cookie cutters today and couldn't resist buying them. So then I decided to knock up some quick Christmas tree shortbread biscuits!
I used just a basic butter shortbread recipe with:

125g (4oz) butter
60 g (2oz) caster sugar
180g (6oz) plain flour

1) Cream the butter and sugar together in a bowl
2) Stir in the flour
3) Knead until firm..don't need to much though!
4) Roll out onto a floured work surface and cut out some shapes!
5) Put into an oven at 180 degrees for about 20 minutes.

I used a bit of butter cream icing mixed with green food dye for the decoration and some silver balls (icing looks yellow in my pic..it's not?!). You can just use glaze icing with water but I really hate the taste!

I rushed these, might make some nicer ones at a later date! Also will be making some Xmas cupcakes so looking forward to that! :-D

Thursday, 6 September 2012


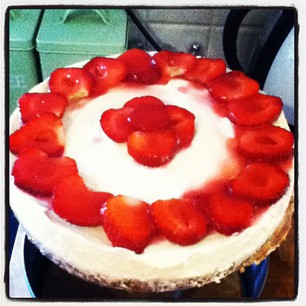
I made this for my sister's birthday and it went down verrry well! I was actually really worried about the amount of soft cheese I put in thinking it was going to taste like a proper cheese fest..but it didn't! It was delish!

To make this you need a cake tin with a loose bottom, otherwise you won't be able to get the cheesecake out! I also put a bit of grease proof paper on the bottom of the tin so I could get it off the base easier. It would also be beneficial to have an electric mixer, I used a hand held one otherwise your arm is gona ache a lot when mixing things together!

You will need:
250g (8oz) digestive biscuits
150g (5oz) butter, melted
1 vanilla pod (vanilla extract will do)
600g ( 12oz) soft cheese (full fat!)
100g (3oz) icing sugar
284ml double cream

For the topping:
400g (14oz) strawberries
25g (1oz) icing sugar
1tbsp water

1) Put the digestive biscuits into a food bag and bash into crumbs with a rolling pin. Transfer the crumbs into a bowl and pour over the melted butter. Mix it until all the crumbs are well covered. Line the bottom of the cake tin with some grease proof paper and then tip in the crumbs. Press the crumbs down firmly so that they are well stuck together and the surface is even. Put this in the fridge for 1 hour.

2) Place all of the soft cheese, the icing sugar and the vanilla seeds (3-4 caps of vanilla extract) into a bowl and beat with an electric mixer. Once all combined pour in the cream and beat until all the ingredients are combined and the mixture is firm.

3) Carefully spoon the mixture onto the base from the edge working inwards. Make sure there are no air bubbles. Smooth the top of the cheesecake with the back of a spoon and put in the fridge to set over night. If you don't have time over night then at least 4-5 hours should do it as long as the mixture is already fairly firm (which it should be).

4) The topping should not be made until the next day to prevent the strawberries going soft or preventing the top of the cheesecake from setting properly. To make the topping take 200g of the strawberries and half them. Then put them in a deep bowl or jug, add in the icing sugar and water and then mix with an electric mixer to make a puree.

5) Arrange the rest of the strawberries however you want on the cake and then pour over the puree however you would like it. Put it back in the fridge until 30 mins before serving.

6) Take the cheesecake out of the fridge and leave it for 30 mins to get it up to room temperature, this makes it easier to slide the cake out of the tin. Get a tall glass (pint glass) and place the cake tin on top. Slowly and carefully pull down the cake tin to remove the cake. If you can, use a fish slice or large spatula to take the cake off the metal base. If the cake won't come off the base, just leave it and serve it with the base on..no one would know!  

Enjoy! 

Friday, 6 July 2012

Chocolate Cup Cakes with Chocolate Ganache!


I actually got this recipe out of the Daily Mail when the whole "Britain's Best Baker" thing was going on. I have tweaked it a little though because it seemed more complicated than it needed to be! 


You will need:
20g (1oz) cocoa powder
100g (40z) butter
100g (4oz) self raising flour
150g (50z) caster sugar
2 Medium eggs


1) Cream the butter & sugar
2) Beat in the eggs
3) Add the cocoa powder & stir well
4) Add in the flour & stir well again
4) Pour the mixture in to cases and put in a preheated oven at 170 / Gas 4 for 20-25 minutes!


This made 7 cakes for me! 


For the frosting I made chocolate ganache! I've never made this type of frosting before but it was so simple & it's soooo rich & chocolatey!


To make the ganache you will need:
50ml (2fl oz) double cream7
60g (2.5 oz) milk chocolate


1) Break the chocolate up into very small pieces
2) Pour the cream into a small pan & heat until boiling
3) Once the cream is boiling add the chocolate & stir well until the mixture is smooth & shiny.
4) Take off the heat & leave to cool
5) Spread or pipe the ganache onto the cakes!


White Chocolate Cup Cakes with White Chocolate Frosting!


I haven't baked in AGES and I had a lot of time on my hands today so I thought why not do some baking?! By special request I made these white chocolate cup cakes! I improvised on the recipe and got rather worried they wouldn't turn out but they came out perrrrfect I am very pleased!

To make them you will need:
125g (4oz) butter
125g (4oz) caster sugar
125g (4oz) self raising flour
2 medium eggs
1 tsp vanilla extract
100g (3oz) white chocolate


I made 10 using these measurements (though I did eat some of the mixture ha!)


1) Preheat the oven to 170 / Gas mark 4
2) Cream together the butter & sugar
3) Beat in the eggs
4) Melt the chocolate in the microwave on a medium heat for about a minute and then add it to the mixture
5) Stir in the flour and add the vanilla extract
6) Pour the mixture into cake cases and bake for 20-25 mins!


To make the frosting you will need:
125g (4oz) butter
250g (8oz) icing sugar
150g (5oz) white chocolate
1 tbsp of double cream


1) Beat the butter & icing sugar
2) Melt the chocolate in the same way as earlier & add it to the butter & sugar
3) Stir it realllyyy well!
4) Add the tbsp of cream & beat the mixture (I used an electric whisk as it was a bit grainy and this seemed to solve the problem!)
5) Pipe or spread onto the cooled cakes!


This frosting is absolutely delish! BUT! It is very sickly..so try not to eat too much like I did!!